I want to talk about styles. There are tons of free styles that you can download off the net, as well as lots of styles you can buy. Just Google Photoshop styles or visit any digital site and you’ll know what I mean. And I have tons and tons of styles, but I always had a problem with most of the styles. Most of them just didn’t seem to make my elements look the way I wanted. And I couldn’t figure out how to make styles from texture photos. It took me awhile to figure it out, and I only stumbled upon it by accident. Some things are just not quite so obvious to me. So I thought I would write a tutorial to help others with styles.
One of the first things you should do is create your Blank Style Set. Photoshop comes with a default set of styles and there is no way to delete all the styles except one by one. The default set of styles includes a white circle with a red line through it.
Put your cursor over the first style after that white box. Hold down your ALT key and you will see the cursor change to scissors. Keep holding the ALT key while you left click your mouse and the style will be deleted. Keep deleting until all styles are deleted and you are left with only the white box with the arrow on it. (By the way, this is also the way to delete shapes from your loaded shapes palette.)
Now click on the little drop-down arrow as shown on the image and this will bring up your Styles choices.
Click on Save Styles and name it “A Master Style Set”.
I use this name because it keeps it on the top of the list of all my styles. Now each time you wish to create a new set of styles, you will not have to delete all the styles in your styles palette. Just Load Styles (from the same Styles Choice Box) and load the Master Style Sheet.
Open any texture photo you might have. One of my favorite sites is CG Textures. Or you can take pictures of various different textures. I am using a metal texture. Open the texture picture, and choose Image > Duplicate. Name your duplicate image and close the original.
Go to Filter > Other > Offset
Choose the settings as shown below and click OK.
Go to Edit > Define Pattern and name your pattern. Click OK and close your duplicated texture photo. You do not have to save the duplicate.
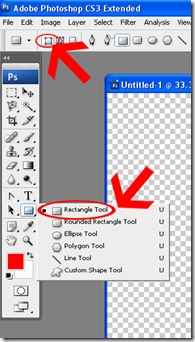
Now create a new document (any size you wish). I usually start with a 5 x 5 inch, 300 pixels document. Choose your rectangle tool (bottom arrow) and make sure the shape layers selection is selected (top arrow).
Draw out a rectangle; it doesn’t matter what color you use. Then go to Layer > Rasterize > Shape. You now have an element to create your style with.
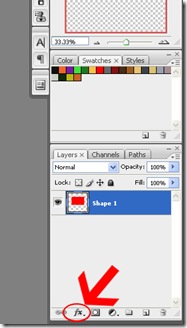
See the little FX on your layers palette?
Click on that to bring up your Layer Style and click on Blending Options.
You can now choose all the elements of your new style.
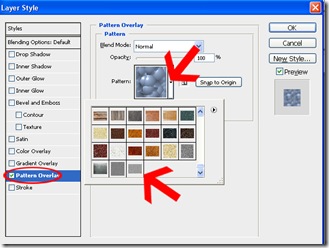
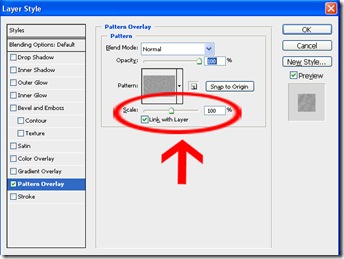
Double Click on Pattern Overlay and you will now see the Pattern Box (top arrow). Click on the little drop down arrow and all your patterns can now be seen. Go to the bottom of the list and the last pattern will be the one you just created. Double click on that but DO NOT click OK yet.
You will see that your pattern has now filled your rectangle. But here comes the most important part.
Underneath the Pattern box is a scale with a slider and a %.
If you slide that slider back and forth, you will see the texture photo change. It increases or decreases the image. Just keep sliding until you get the desired effect you want on your rectangle. If you want a bevel to your style, click on the Bevel and Emboss and change the Depth and Size as you desire. Again DO NOT click OK.
Under your blending options, you can add any other effects you wish: Drop & Inner Shadow, Outer and Inner Glow, Stroke, etc. When you have your desired style on the rectangle, then it is time to save your new style.
Click on New Style and then name your style whatever you wish.
You will see your new style appear in the Styles Palette. You can continue making several different styles in this style set. For example, if you are making metal styles, like I am, then you might want to make several different types of metal styles using different metal texture pictures. Or wood styles, or cardstock styles, etc, etc.
Once you have all the styles finished in this set, then Save Styles like you did earlier when you saved your Master Style Set. You now have your new Style set.
The important thing to remember is that anytime you use a style, whether it is one you made, purchased, or downloaded as a freebie, always bring up the Blending Options and make any changes you wish. After you have applied the style of your choice to your element, you can then double click on the style effects (see the red arrow below) and make any changes to that style you wish to make your element or paper look how you want it to look. Just as you used the slider to change the image when you created the style, you can also use the slider again on ANY style after you have applied it.
Sometimes a style will look good on a large tag but that same style will not look good on an alpha or some other element. You have to go into the blending options and make adjustments. This is the key that I never understood. I would use the purchased style (or one I had downloaded as a freebie) and it would just not look right. It never occurred to me that I could change the settings of any style because I did not truly understand how to create one.
So I hope that this helps in understanding layer styles and how to use them. And as my freebie, here is my set of metal styles I made for this tutorial.
Hope you enjoy it and may you have a God-filled day.





6 comments:
thank you kindly for the styles and tutorial
Thank you so much for this Freebie. I want to let you know that I posted a link to your blog in CBH Digital Scrapbooking Freebies, under the Page 5 post on Oct. 19, 2009. Thanks again.
This is fabulous! I'll have to try it. Thanks for the styles.
Thank you for the great information on making styles. I can't wait to try it. Thank you again for sharing.
Your styles tutorial is awesome! I am very familiar with PhotoShop because of my job, but Styles never entered my job so I was ecstatic to see such a well written and easy to follow tut to show me how to add this to my playing skill set! THANK YOU!!!!!!!!!!!
Hi Micki. Wonderful tutorial. Before trying this (!) make sure you've backed up all of your photoshop default styles to a different location on your harddrive or to any external hard drive. Now, If you go to the edit menu and select Preset manager (sometimes you have to select "show all menus") you can then choose styles from the dropdown menu, click on the first style, hold down the shift key, click on the last style then hit the delete key to delete the styles. I BELIEVE you can get them back if you've saved them someplace OTHER THAN in the place where photoshop saves them as default location.
I discovered this by accident, but it has been a lifesaver for me.
Post a Comment